Sunday, 21 February 2010

Long time no update...

Sorry everyone, poor health, plus a trip up to London meant it's been a long old time since I actually updated this blog (and commented on all your stuff, which is even worse).  However the trip to London was fantastic with the high point being Saturday.  I've been getting a bit excited about the movie "Solomon Kane" (IMDB link) - OK maybe more than a bit, but anyway...  

Opening weekend this weekend, and the main actor, James Purefoy (he of "Rome" fame) and the director, Mike Bassett, were signing all sorts of expensive stuff at one of my favourite stores in the whole world. Forbidden Planet.  So I got a cool canvas and a "making of" book signed by the pair of them, shook the hand of the director and chatted to Mr Purefoy briefly.  Then off to Leicester Square to see the movie at the Empire.  While not the best movie in the world, it was pretty damn good for the budget (low), and it was an absolute blast to hear an action hero talk with the same accent as me - hurrah for the West Country!  Yes, I loved it.

(...and yep, I'm from the Cotswolds and we all sound like farmers...)

...and easily inspired as I am, I now want to theme my slowly growing Empire army around Witch Hunters (Dark cloaks, pistols, flagellants and Sigmarite Priests)...

...not to mention using Malachi's face make-up on something chaotic.

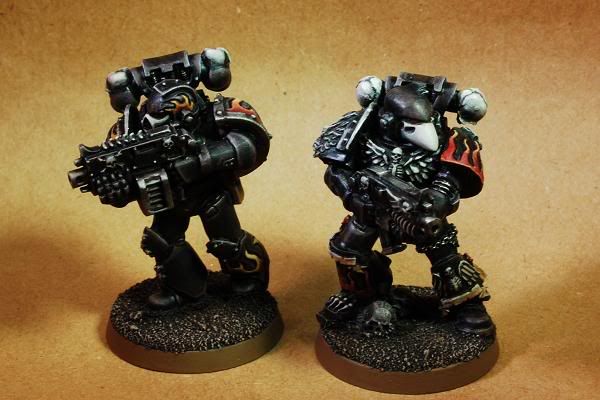
Anyway, got a couple of pictures of my finished Noise Marines.  I'm stopping at 2 for now, these blighters are hard work and I want to do something else for a while.  I'll be taking some more pictures when I have the time - these two are actually an improvement on previous efforts as I've learnt a little about light-metering now - I just need to practice!

Noise Marines 1 & 2


They've both come out really well and they look good next to one another.  As I've said before the third one needs some repair work, before I can even think about painting him.  So this week it's going to be Legion of the Damned and some Empire...

...and good lord, I need to get back on with this updating malarkey...

Tuesday, 9 February 2010

Progress on a Noise Marine

Not much of an update, I haven't don't much painting recently, but the second Noise Marine is coming along nicely I think.
 

My only concern is that he may be lacking a bit of "oomph", and he looks a bit flat - obviously he'll look better when the back pack is on, but it feels like he's lacking some colour.

What do people think?  All criticism gratefully received!

Thursday, 4 February 2010

Mid-Week Progress Report: Getting some structure into what I do

I really, really have to work on updating this blog more than twice a week.

But, more than that I need to organise what I paint better.  The last few weeks, months even, I've done bits and bobs with very little to show for it.  So, the plan is to organise what I'm going to paint into "Main projects" and "Side projects", concentrating on the main and spending half an hour at a time on the side projects when I get stagnant/stall/hit the wall.  The difficult bit is going to be only doing half an hour on the side project, stopping, and then moving back to the main project(s)...

This is also going to be difficult as I can't really batch paint - I suppose I can, but I don't enjoy it.  I've managed 5 Imperial Greatswords before, but even that was a struggle.  Also, I'm quite a slow painter and rather too easily distracted - not an ideal combination!

The Main Projects
  • Legion of the Damned - I want to get 250 points of these guys done to compliment my Crimson Fist force (of which I have 750 points).  I currently have 2 marines painted and I'm about to start on a chap wielding a Multi-Melta (the first time I’ve ever painted one of those weapons!).  Then it will be two more marines and a sergeant.
  • Noise Marines - the first chap is pretty much finished and the second is well under way (see the picture below).  The third Guitar-wielding psychopath needs some reconstruction work as the previous owner chopped off the end of the guitar (but thankfully kept the piece), so it looks like I’m going to get my first experience with green stuff - should be interesting!  The other marines that will make up the squad will have to wait for a while.  Thanks to the people at the B&C forum I have a good idea for a Doom Siren, and it looks like I have the parts for it too - bonus!
The Side Projects
  • Imperial Carroburg Greatswords - I’ve got 8 done, I just want to get them to 10 (for now), so I need to get the standard bearer and one soldier done.  These guys are a mix of Empire soldiers from the last 20 years, and at some point I plan to add the latest box set to make up a unit of 20 - a real mongrel unit!  These are painted in the darker, rougher, "John Blanche" style, which did make batch painting a little easier, and feels very "Old Worldy" to me 
  • Khorne Berzerker test model (see the picture at the top) - finally stumbled on a red I like (gotta love trial and error) and I had some Berzerkers I found second hand and cheap in a local model shop.  So one of these nutcases will be painted up, more pictures to follow!
I have plenty of other ideas (and certain people have been tempting me to try Tau recently with their lovely painted stuff, I may have to get some of those funky looking Stealth buggers!), but I’m trying to put them to the back of my head while I get the two main projects I have done first.

It does make me wonder how other people stay so focused?  Any hints and advice would be most welcome.

So, after all that wordage - progress!


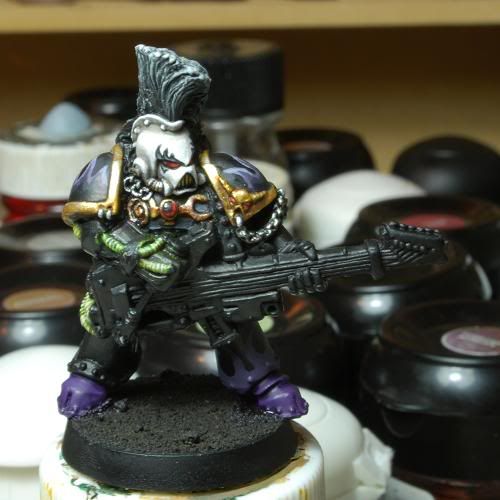
Second Noise Marine - the KISS style helmet has come out well, and I’m really pleased with the purple flames.  The guitar will be black, and the arms will be painted the same as the first noise marine.
The flames on the greave are the base coat of what I've done on the shoulder pads - which I should have taken pictures of as they've come out really well.

Legion of the Damned - I wanted to do something a bit different to how they painted them in White Dwarf.  As good as they looked in the magazine, I thought they looked too clean - these guys are meant to have been to hell and back, and I wanted their armour to look like it had been ravaged by age and fire.  So I went for a Scorched Brown and Codex Grey highlight to the black, and a Tin Bitz base coat for the metallics.


I’m not entirely sure I’ve pulled it off, but they look different and I felt that was a good start.  When I get some burnt grass flock from GW, I'll properly finish the bases off.

As always comments and criticism are welcome!

Sunday, 31 January 2010

Breviccus Flavus

  OK, that was a really poor attempt at Latin – Breviccus is a poor Latin bastardization of Brevik and Flavus is Latin for Yellow.
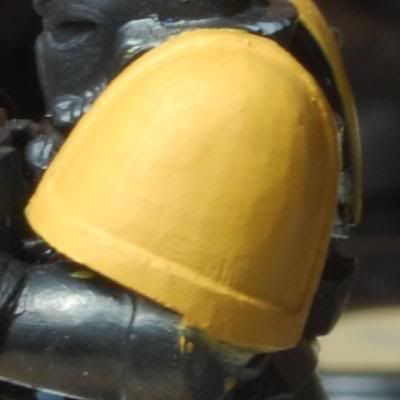
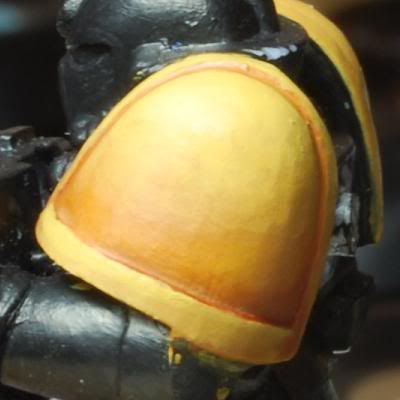
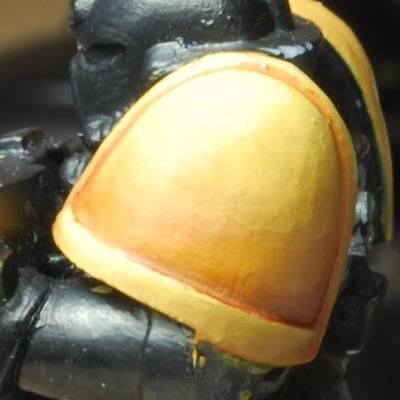
No prizes for guessing what this is about, Dverning said he’d be interested in a stage-by-stage thingy on how I painted the Yellow for the Lamenter sergeant I did recently, so here goes…

It’s all yellow…
This is not the bright yellow you’ll see in White Dwarf, it’s a softer tone.  I’ve also highlighted differently – I’ve never liked the way they highlight Space Marine shoulder pads at GW, so I tend to highlight as if there is a light directly above the miniature.  I can’t stress how important it is to water down your paints, especially for the highlighting stages – go for more thin coats than one thick one

 1.  Basecoat – Thinned Tausept Ochre was applied in a series of coats to create a solid block of colour.  It might be worth trying a lighter primer than black here, as it did take a lot of thin coats to get to this point.


2. Shading Wash – One wash of pure Gryphonne Sepia – try not to use too much, as it will darken the overall colour.

  
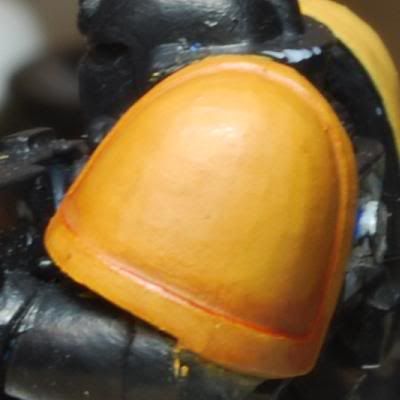
3. First Highlight – Thinned Tausept Ochre is applied to the whole rim apart the bottom right corner (as you look at the picture) as this is effectively “in shadow” from a top-down perspective.  It’s also applied to the top 2/3 of the inner shoulder pad.

4. Second and Third Highlights – The second highlight is a thinned 50:50 mix of Tausept Ochre and Iyanden Darksun, the third highlight is just tinned Iyanden Darksun.  Hopefully the picture shows that these highlights are graduated towards the top of the inner pad and towards the top edges of the rim.

5. Final Highlight – A thinned 50:50 mix of Iyanden Darksun and Dheneb Stone is applied to the very top edges of the rim and the top 20% or so of the inner pad.

The End.
At some point I’ll do something similar about the battle damage on the sergeant.
As always, comments and criticism always welcome.

Tuesday, 26 January 2010

Grrr, was this worth the effort…?

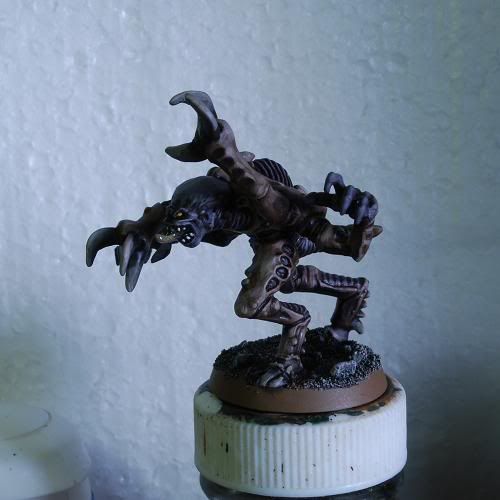
So I had these grand plans to do a little “painting a Genestealer” stage-by-stage, taking pictures as I went.  Unfortunately the pictures haven’t turned out great, I really need to practice this picture taking malarkey to be honest.  As it’s my first attempt at one of these, I thought I’d throw it up here for people to criticise, comment and advise, rather than hide it and try and perfect it for some unknown time in the future.
So here’s how it went:

Intro
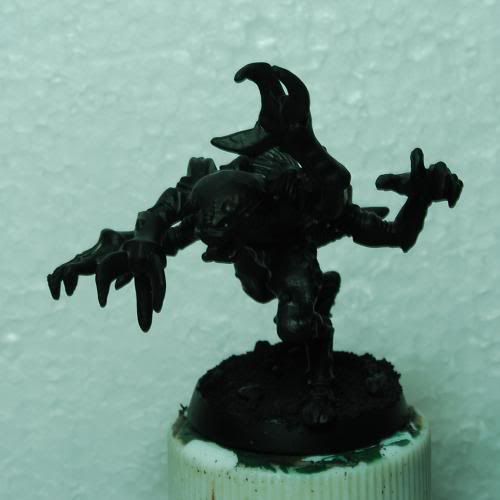
I’m a huge fan of the movie “Pitch Black” (the movie that gave Vin Diesel’s Riddick his first outing), and I’ve always been tempted to paint some Tyranids in something like the colour scheme of the monsters in the movie.  I’ve had these old Genestealer models hanging around for an age, and the new Tyranid Codex has got me toying with the idea of starting an army of ugly bug creatures.  As all armies start with a single soldier (this is in NO way a famous, or even a particularly good phrase…), I started with this one.


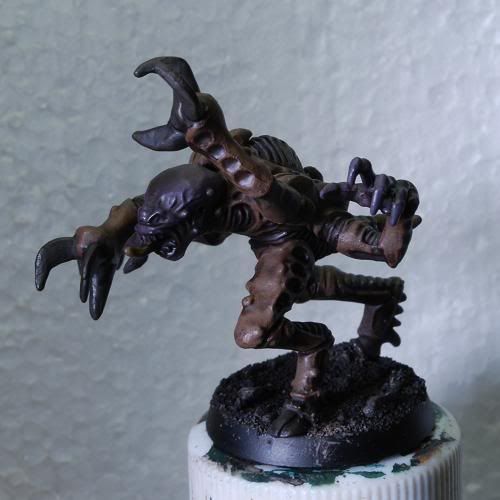
1.  Undercoated Black.  Nothing novel there – I tend to undercoat in black as it gives me a good start for shading.  My miniatures tend to be a bit more “grimdark” (love that term), than in White Dwarf, as I don’t like bright colours.  I also base miniatures before undercoating – I notice my local GW store doesn’t do this – I think it’s crazy, as it saves a lot of time in the long run.


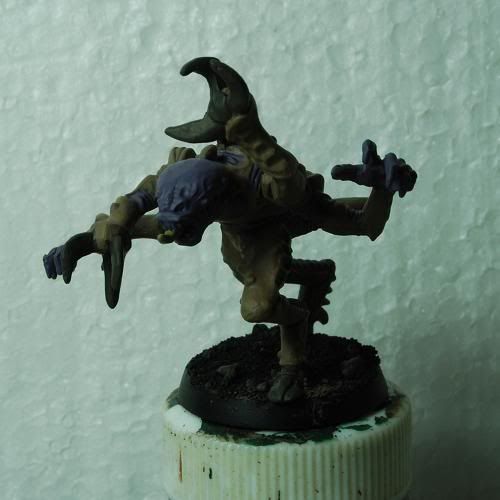
2.  Basecoats.  Main body is Khemri Brown, Claws and feet are Charadon Granite, and the head and fleshy bits are Leviathan Purple.

Nothing particularly ground breaking here, just a good solid foundation. I wasn’t too fussy here, as the next stage would cover up any mistakes…


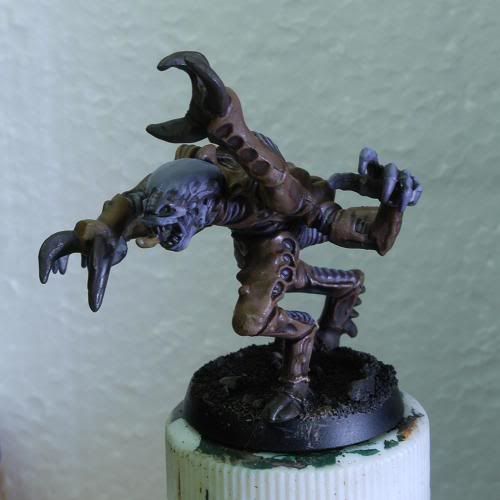
3.  All over wash with Devlan Mud – this ties everything up together and provides the basis of some graduated shadows.


4.  Highlighting the purple.  I did the highlighting in two stages:
  • 50:50 mix of Codex Grey and Leviathan Purple
  • 33:33:33 mix of Codex Grey, Leviathan Purple and Astronomican Grey

Not too bright and not too purple – the effect I was going for!
NOTE:  By this point I was reasonably happy with the way this was going – it was all going together the way I wanted and the pictures weren’t too bad.


5.  Highlighting the claws and feet.  Here a three stage highlight:
  • Charadon Granite
  • 50:50 mix of Charadon Granite and Dheneb Stone
  • Pure Dheneb Stone


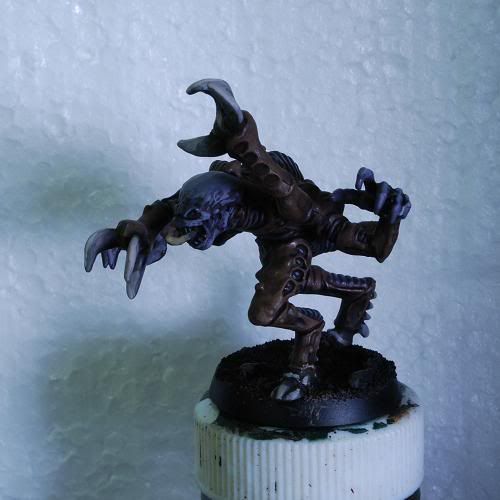
6.  Highlighting the body.  Again a three stage highlight:
  • Khemri Brown
  • 50:50 mix of Khemri Brown and Dheneb Stone
  • 10:90 mix of Khemri Brown and Dheneb Stone

NOTE:  This is where it starts to go downhill a bit (in my opinion, readers may think the decline started much earlier…).  The picture’s not great and the highlights on the body look a little “slapdash”.


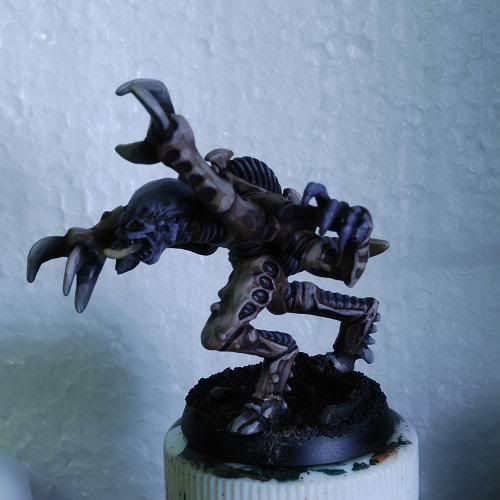
7.  Finishing up.  I’d already planned to throw some “Blanchitsu-style” at this ugly monster, so I gave it an all-over wash of very watered down Devlan Mud.  Once this was dry, a very, very light drybrush of skull white was added to the top edges and surfaces – this helps pick out the top parts of the model and gives a little more definition – good for standard troops, not so great for character models where a more controlled highlight works better.  Final painted bits
  • The tongue was highlighted with Gretchin Green and Dheneb Stone
  • The teeth were painted Bleached Bone and the the tips painted with Skull White
  • The eyes were painted Snakebite Leather, shaded with a line of Chaos Black and highlighted with Iyanden Darksun
  • Base done in the usual Brevik way, drybrush with a brown (Khemri Brown here) and then Skull White.  Edge of the base is Graveyard Earth

Finally the model was sprayed with Humbrol Matt Acrylic Varnish – which is a far better product than that satin stuff that GW sell, this is a proper Matt finish.  Some gloss ‘Ardcoat was painted into the mouth and on the tongue to give that slimy “Alien” look.
NOTE:  It really falls down here, the picture is bad and in no way does the miniature justice.  I’m going to sort that out.

End of “Article”
So what do people think?  Was anything good about it?  Was it useful?  What can I do to improve it?  As for all the things I’ve posted on this blog, all comments and criticism greatly received.  Feel free to be brutal (as long as it’s polite ;-) ). 
I’ve learned a hell of a lot from various sources on the internet, and I really want to start paying that back.