Monday 27 June 2011

Crawling back out of the woodwork...

Argh, it's been over two weeks since I last posted here - not good enough really, as I haven't been commenting enough on other people's blogs either - I hope you'll accept my apologies for that?  I have been painting, but for my next Ancible article - my deadline is the end of the month, so after that I'll be cracking on with my own projects (hopefully!).

This weekend, around attending this years Hard Rock Calling festival in Hyde Park, I did manage to do a little miniature related stuff, both research and purchasing.  Mrs Brevik and I made our usual (almost monthly) pilgrimage to the British Museum and we had a good look at the "Treasures of Heaven" exhibition they have running there at the moment:


It's a nice exhibition of Christian sacred treasures (relics, etc), which gave me some good inspiration for a project or two (both fantasy and Sci-Fi).  I tried something like this a few years back when I painted Hector Rex for the Swindon GW store (apologies for the picture quality, this was taken with a phone camera...):


What I'm talking about here is the ivory chest piece and the gold box hanging from his belt.  The reliquaries in the exhibition were carved ivory, or finely worked gold and/or silver.  If I remember correctly I painted the ivory on Hector like this:
  • Base coat: Bleached Bone
  • Shade: Gryphonne Sepia Wash
  • First highlight: Bleached Bone
  • Final highlight: Bleached Bone and Skull White
Back to the exhibition, the entrance fee of £12 is a bit expensive for what you get to see, it's certainly not on the same scale as the Terracotta Army exhibit a few years ago that's for sure, and you can see similar things in the museum itself (which is free to enter).  The accompanying photo book/guide/text book/mighty tome was another £30, but as photography is forbidden in these special exhibits, it's good for remembering what we've seen and it's a useful bit of reference material, plus it's a good quality "coffee table" book too.

My other miniature related activities in London involved a trip to Orc's Nest in Covent Garden and purchasing a couple of Copplestone Castings blisters (Photos courtesy of the Copplestone Castings website):


FW3 News Team and Minders

I have no idea what the "robot butler" character (the oddity in the middle) is doing among this lot, but this little crew had me thinking about a scenario involving them trying to escape an urban setting from this group of nasties...


FW25 Hunter Aliens

These were too good to pass up...

Having inspected the contents of the blisters, they're all nice clean sculpts and should be a lot of fun to paint, although they're somewhat down the list of stuff to work on, so I might not have pictures of them for a while.

Again my apologies for not posting or commenting for a couple of weeks, hopefully I'll be back up and running soon.  Maybe in the next post I'll have something finished to show you...

Stranger things have happened.

Sunday 12 June 2011

Let there be light

As longer term readers will know, I've always had issues with taking photographs of my miniatures, particularly with the amount of light I could get on the subject.  In recent months I've managed to ease this problem by taking pictures outside (starting with the Juggernaut ).  Unfortunately the British summer has got back in to its usual pattern, and has started throwing it down every so often, making picture taking outside a risky and soggy experience (I haven't tried it by the way, just imagining).

A few weeks back, a "quick" trip to IKEA (just some oak and some pine and a handful of norsemen...) yielded three of these bad boys: 


Photo from IKEA

I'm a big fan, only £8.16 for something that clamps to a desk/work surface and fully adjustable, and can take a 20W energy saving daylight bulb (effectively 100W).  Speaking of which, I managed to pick up some bulbs from my local art store - Craft Factory PureLite 20W.  Unfortunately they only had two, so I'll have to pick a third up from Amazon or somewhere.

So the current photography set up looks like this (these pictures are a little ropey due to using my phone camera):


The top lamp is my trusty painting lamp with an 11W daylight bulb in it, obviously this will be replaced by the third Tertial when I get the bulb for it.  The light box is my own self made affair that I've been using for a while now.  I think I'm going to have to replace the top and side panels, which are currently tissue paper, with something a little more transparent (tracing paper maybe?  I'll need to do some research).

The early results aren't bad but required a little editing in Picassa to bring the light levels up:


This is Huron "post-droppage", which I don't think I've photographed before, I'm still really chuffed with this paint job, even though I've learned a lot since finishing him, and would possibly have done things differently.

Progress wise, things are on track.  The painting for next article of the Ancible is progressing well, although the whole process is slowed down somewhat by the need to take pictures at every stage, but it's still enjoyable.  The Ashkasa is going slowly, but steadily, and I'm making good progress on Boris:


I bought this chap because of the armour, I love the look of the scales and the skull breastplate, and the horned head sword hilt is nice too. It would have been too easy to paint the scales of his armour red, and invite the Khorne/Skorne comparisons, so I opted for blue instead.  This makes him a little less evil than the red would have, but the scales have come out nicely and work well with the gold.  The more I painted the Boris, the more "World of Warcraft" he looked, particularly the face, so I went full on for that look when I did the beard orange.  I'm now looking at ways I can accentuate that look with the rest of the miniature.  

Like a lot of Reaper models, Boris is stuck to a chunk of metal sculpted as ground that acts as a base.  I prefer my miniatures to have a stable base, so picked up some 30mm round lipped bases from Orc's Nest when I bought Boris and pinned him to it, filling in with basing sand to neaten up.  I've got a couple of other Reaper miniatures (one also called Boris for some reason - is Boris the name of choice for Evil fighters?) that I will be doing the same with.

So very much onwards and upwards at the moment - as always, comments and criticism welcome!

Sunday 5 June 2011

Damned Legionnaire OSL Fail

You know when you thought you got something right and then you look at the pictures and you realise you haven't?  

I've been looking for a decent and different way to paint Legion of the Damned marines.  My previous attempts, including a browned aged look to the armour, and the standard GW paint job didn't feel right, so this time I tried to do something a little different again.  


What I tried to do was go for a standard-ish paint scheme, an aged look to the metal and some OSL effect around the flames and eyepieces.  I also wanted this to be a quick (well for me anyway) paint job, so I can knock one or two of these out every so often so I have something to show for my efforts.  Just from looking at this picture, the OSL effect around the flames has come out reasonably well.  Unfortunately I dropped a boo-boo when it came to the eyepieces - particularly  that there is a clear line where the OSL stops and unlit bone coloured face mask begins, where that should have been graduated.

Damn.

I am pleased with the black.  I've been looking for a dark grey to purchase - I know it's lazy but I don't want to mess about mixing up a colour if I can get it ready made.  So I found Tamiya's NATO Black in my local HobbyCraft and thought I'd give it a go.  The coverage isn't great, but it does the job.  My biggest bugbear however, is the pot - bearing in mind it's a screw lid, it was a royal pain in the backside to get open the first time.  To be honest, it's such a pain that it's put me off Tamiya paints altogether - I shouldn't be in fear of shattering the pot while trying to open the damn thing (yes it was that bad when I first opened it).


So my new, all-conquering (when I can get the damn pot open) black scheme:
  • Basecoat - Chaos Black
  • First Highlight - NATO Black
  • Second Highlight - Adeptus Battlegrey
  • Final Highlight - Codex Grey
  • Glaze - Diluted Badab Black
The metal follows my usual method for steel these days, working off a Charadon Granite basecoat, but I also added a wash of Gryphonne Sepia at the end to give it a more aged look.  I also drybrushed the highlights in places to give it a more worn, rough look.


I went for a rougher look on the bone too (these guys are meant to have gone through the wringer) - drybrushing with a few painted on highlights.  All-in-all (OSL aside) he's come out pretty well for a quick and dirty paint job, at some point I'm going to make the other 3 I've done so far match this chap.

Elsewhere on the workbench, Boris is about half done, and I've made some progress on Ashkasa (the Rackham miniature), while working on my next article for the Ancible.  I've opened the packaging on my Finecast Harlequin Shadowseer, and I'm pleased to report I'm one of the lucky ones, I can't find anything more serious than a couple of mold lines and some flash!  While I'm not overly happy about the price increases, based on my solitary experience with Finecast so far, I'm happy with the quality of the new material.

Wednesday 1 June 2011

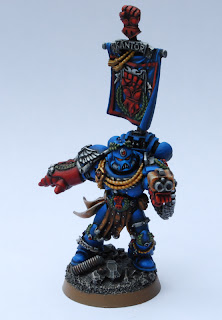
Pedro Kantor completed

I haven't done a whole lot of painting recently - partly due to attending the 2011 Fforde Ffiesta, which was a whole load of fun, and work, which wasn't.


Pedro Kantor is finished, and I'm pretty pleased with him, to be honest he wasn't actually a lot of fun to paint, and he became a bit of a chore after a while.  I have no idea why this is - maybe I've painted too many space marines?  The base came out OK in the end, but it was a pretty dull part to paint, I could possibly have made more of the metallic bits (and I may do yet if the inspiration takes me), but other than that, there's not much to it.  Does it look any better than a flat base with static grass?  I'd have to say no - maybe I just didn't use it right?


The blue is probably a little too bright in the end, I think I went too light over too large an area - the actual blending I'm really chuffed with though. 
  • Basecoat: Regal Blue 
  • First stage highlighting: Blending Ultramarine Blue into the Regal Blue 
  • Second stage highlighting: Blending Ice Blue into the Ultramarine Blue 
I wanted the "loin cloth" thing (I used to know what that was called) to look like leather, so went for:
  • Basecoat: Scorched Brown
  • Shade: Devlan Mud
  • First highlight: Bestial Brown
  • Final highlight: Snakebite Leather.


I decided to make "Dorn's Arrow" (the storm bolter) a little bit flash and paint it gold - this is supposed to be a highly valuable and powerful relic, so I thought gold was a befitting colour for it.  The laurel leaves dotted across the model were  painted with the following steps:
  • Basecoat: Knarloc Green
  • Shade: Thraka Green
  • First Highlight: Knarloc Green
  • Second Highlight: Gretchin Green
  • Final Highlight: Gretchin Green and Dheneb Stone


The metal work started follows the normal pattern I've been using recently:
  • Basecoat of Charadon Granite
  • Shade: Badab Black
  • First highlight: Boltgun Metal
  • Second highlight: Chainmail
  • Final highlight: Mithril Silver
I wouldn't usually use Mithril Silver these days as it's a little too bright for my tastes, but as Pedro is a bit special, it made sense to put a little sparkle (non-Twilight) in there.  It's amazing how pictures show up mistakes that you'd missed previously - the banner pole is pretty dreadful, I'm not sure what happened there, but it's going to need redoing...


The red is maybe not quite as Crimson as I'd hoped for, but it's come out fairly well.  I started off with Scab Red as it's always covered better than Mechrite Red - which is bizarre.  Maybe I just got a ropey pot, but it's the only foundation paint I have that doesn't do the business.  After the base coat:
  • Shade: Devlan Mud
  • First highlight: Scab Red
  • Second highlight: Blood Red
  • Final Highlight: Solar Macharius Orange.
  • Glaze: To tone this down a little, as it was a little too orange, I glazed all the red elements with watered down Leviathan Purple wash.
I'm not a huge fan of back banners on space marines, but this one felt a little more important as he's the chapter master (and it has his name on it...).  Having the symbol molded on to it made painting it a breeze, and the front was one of the more enjoyable parts of the miniature.

So as always, comments and criticism welcome!  Coming up is my latest attempt at painting a Legion of the Damned marine (which is completed now, including glowing eyepieces), something fragile from Rackham, "Boris the Evil Warrior" from Reaper, Gandalf on his cart full of fireworks (for the Mother-in-law, no, really...), and my newly purchased "finecast" Eldar Harlequin Shadowseer which actually looks to have no casting defects (he says without inspecting it thoroughly yet).  Oh and I'm on to the next article for the Ancible too.

I may be taking some time off work...