Tuesday, 30 August 2011

A New Lair (phase 1)

There has been tension in the Walker household, as the compact previous incarnation of the lair seen here:


...has started to outgrow it's limited confines and spread further into our living room (see previous post on new photo set up).  As useful as the "Painting Station of Doom" has been it just wasn't enough room to work properly, and the bench wasn't a comfortable seat.

So agreement has been reached and one of the spare bedrooms in our house will become the new lair!  It will still double as a guest bedroom as there will be a rather comfortable IKEA sofa bed (the same model as seen recently at Tentakel Games) staying, but the majority of the room will be turned over to the dark arts.

Like all diabolical schemes, it will be multi-phase and phase 1 has been achieved:


Some notes on the pictures:
  1. A blind will be going up at the window, to save premature blindness
  2. The ironing board is going...
  3. In the bottom of the second picture, note the black and white furry demon, Hex, bane of anything small enough to bat off a table (and he tries to drink my brush washing water too...).  
So phase 1 is complete, including the TV in the corner, which means I can keep up to date with news and the football, or watch QI and Mock the Week while painting.  Mrs Walker is happier that all my stuff is out of the living room and we don't have to worry about the cats (oh yes, we have more than one) knocking things over.

Phase 2 is planned and a week away from commencement.  You may have noted the bizarre gothic style fire place.  To fit the ridiculously large mantelpiece (origin and construction unknown, no STC found, possibly xenos...I've still yet to work out how the damn thing is attached to the wall), a previous owner of the property used plaster board to extend the width of the chimney breast - and yes dear reader, those words in your head match the ones in mine when I discovered this.


The picture below helps show the extent of the insanity:

 
By process of knocking on the wall and seeing where the hollow sounds stop and the solid sounds begin, I've found the extension of the chimney breast begins at roughly the centre of the mantelpiece support column.  So Phase 2a will be somewhat destructive, removing the hollow bits, and stripping the wallpaper (the woodchip variety, scourge of DIY).  Phase 2b will then be the painting of the room using a lovely shade of white to maximise the light in the room.  Phase 2a and 2b are planned for next week which I'm taking off from work.


Phase 2c will involve adding this splendid piece of furniture in the corner and I'll probably be getting a new chair too. Hurrah!

As always, comments and criticism welcome!

Tuesday, 2 August 2011

Festivaled-out...

The wife and I attended WOMAD (World of Music and Dance) again this year, saw some fantastic acts, particularly Ayarkhaan, AnDa Union (Music to paint miniatures by I reckon), Lau and Booker T Jones (legend!) and ate some fantastic food.  I'm now knackered and looking forward to a quiet weekend.  Unsurprisingly no painting got done (living out of a tent would make it difficult), but some of the costumes were good painting inspiration!

A little progress has been made on the Rackham miniature I started a while back - the face needs some work, but I'm very pleased with the leather around his midriff, and a really simple scheme too:
  • Base coat:  Calthan Brown
  • Shade:  Devlan Mud (surprised?)
  • First highlight: Calthan Brown
  • Second highlight: Snakebite Leather blended in

The buckles were outlined with a targeted wash of Devlan Mud and then highlighted with Chainmail. The blue was also something different, with a base coat of several thinned coats of Necron Abyss highlighted with a mix of Necron Abyss and increasing amounts of Hormagaunt Purple added in.

I'll be adding to him in and around my other projects - but he's such a delicate and interesting model that he really needs some dedicated time and effort spent on him.  So don't expect him finished any time soon!  I went for a grey undercoat for this model as I wanted to experiment with some different methods for different colours - I really think the leather work has benefited from a different approach.  I'll admit I get very stuck in my ways and tend not to experiment too much with colours - this is going to change from now on, so while I will go back to some colour schemes I know work, I will be branching out a bit more.

In other news, the article work is ongoing - the photography element really does slow things up from a painting perspective, but it does mean I'm concentrating that much harder on getting things to look right at very close up.  The Reaper miniatures from the last post will be undercoated tomorrow (hopefully), and should be started (and maybe completed?) this weekend.

The football season starts this Saturday, so I'll have something else to distract me!

Thursday, 28 July 2011

Not such a grim Reaper...

Not too much painting going on this week, I've done a little bit for my next article, and I've got the next couple of side projects started.  My love affair with Reaper miniatures continues:


Not quite sure what I'm going to do with this chap yet, I'm thinking different hues of black, with some dulled metalwork.  The other side project is Boris MkII:


I'd like to keep with the "Boris the Black" theme, so I'm thinking black cloak with some freehand on the back, and some beaten up armour - plenty of dents and scratches with some rust in places.  Or maybe black armour (still beaten up) with a dark red cloak?  Opinions (and alternative ideas) would be most welcome!

As you can see I've only pinned them to the 30mm bases so far, the next stage will be to fill in the gaps between the metal base and the edge of the rounded lip with modelling sand (and for Boris MkII, some bits of slate, stuck up at the front), and then they'll be undercoated.  Also on the horizon is Gandalf on his cart full of fireworks, and at some point the other Warjack from my Khador box set.

Then there are the Eldar Dire Avengers...

...and some Confrontation minis...

...and for some reason I'm itching to paint a Space Marine again as well - what's that about? 

Sunday, 24 July 2011

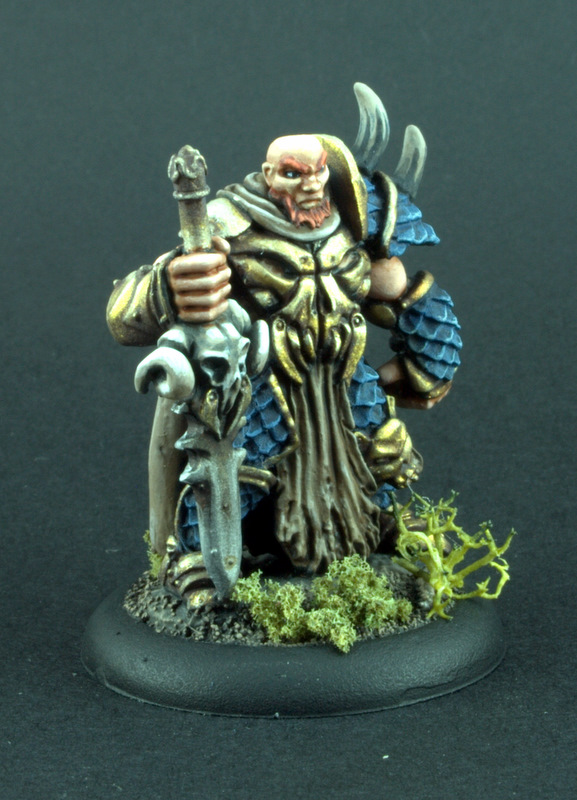
Big Bad Bald Bearded Boris

I'm really pleased with this chap - he does look like he's been ripped right of World of Warcraft (his fists are bigger than his head for a start), but that's no bad thing, and it was nice to do something a bit brighter than usual.  Boris was a single piece miniature, and quite two dimensional, but I love the pose, and it feels quite "old school". (early WIP shot here)


The blue was simple enough, a Necron Abyss base coat, highlighted with Regal Blue and then Ice Blue (with a little mixing for in-between stages).  The highlighting was done with drybrushing rather than blending - this chap was meant to be a little light relief in between projects, so I wasn't going to stress out blending each individual scale.


The horns and sword hilt were simply a progression through Charadon Granite, Khemri Brown, Dheneb Stone and for the sword hilt only a top highlight of Skull White - these were blended/layered as the surface areas were larger.  Charadon Granite and Chaos Black were used to paint the striations on the horns.

The skin tone is my favourite thing about the model , a base coat of Tallarn Flesh was washed with Gryphonne Sepia.  This was highlighted (blending) with Tallarn Flesh and then a 1:1 mix of Tallarn Flesh and Elf Flesh. finally a top highlight of Privateers P3 Ryn Flesh was blended in.  This gives a slightly paler flesh tone than I would usually use, but it works well with the ginger beard and eyebrows, a World of Warcraft inspired colouring.


The Gold started with a base coat of Tin Bitz, shaded with Devlan Mud.  This was then highlighted with multiple thin layers of Burnished Gold working towards the edges of the armour.  Then a 1:1 mix of Burnished Gold and Mithril Silver was applied as a top highlight.  The sword blade was Boltgun Metal shaded with Badab Black, with a blended highlight of Chainmail.  Some Devlan Mud was applied to the blade, just beneath the skull hilt to add a little more shading.


The cloak and tabard is my normal "exciting" scheme of Khemri Brown, shaded with Devlan Mud and blend/layer highlighted with Khemri Brown and Dheneb Stone.  To continue the WoW theme I added some moss and lichen to the base (also to mask where the lump of metal he stood on joined the base I added him to), and he was complete!  A quick, easy and funky looking model which was fun to paint, it's nice to have something like Boris on your painting table to give you a break from the serious projects.

I'm a huge fan of Reaper miniatures (http://www.reapermini.com/) - they're not all brilliant, but there are so many lovely looking miniatures full of character, that it's easy to find something fun to paint.  Also I recommend the search section on the galleries - really helps if you're looking for something specific (e.g. someone human male, in plate armour, dual wielding...).

As always, comments and criticism welcome!

Sunday, 17 July 2011

Polluted Royalty

I've posted about this chap a while back, but hadn't progressed him for ages.  I'd got a bit stuck with him, but in my desire to get my workstation cleared ready for the next projects, I put some serious effort into getting him finished.  Only quick pictures today, I'm going to sit down next weekend and learn how to use this camera properly...


I've described the green method before, but here it is again:
  • Charadon Granite base coat
  • Devlan Mud wash
  • Charadon Granite overbrushed highlight
  • Charadon Granite + Catachan Green
  • Catachan Green
  • Catachan Green + Camo Green
  • Camo Green
  • Camo Green + Dheneb Stone as a thin edge/point highlight

As I've said I'd toyed with the idea of leaving it "clean", but this didn't feel right for a Nurgle Lord, so I painted in some discolouration patches
  • Base coat: Scorched Brown
  • Shade: Devlan Mud applied to the recesses
  • First highlight: Bestial Brown
  • Second highlight: Snakebite leather
This was also the scheme used for the Chaos Star quarters on the corners of the cloak.


I ditched the original brown colour of the cloak for a khaki/beige look .
  • Base coat: Khemri Brown
  • Shade: Liberally applied Devlan Mud
  • First highlight Khemri Brown
  • Second highlight: 1:1 mix of Khemri Brown and Dheneb Stone
  • Final highlight: Dheneb Stone
I think this works much better against the green.  I'm really pleased with the freehand - nothing complicated, but it's come out nicely, and not too big to be overwhelming.  I don't do a lot of freehand work, so it's something I'm going to be practicing more of from now on.


I wanted to make the metalwork look aged without it being too rusty looking - I know he's a follower of Nurgle, but a Lord still wouldn't be too impressed with having to use rusty axes I'm sure...
  • Base coat: Tin Bitz
  • Shade: Devlan Mud applied liberally
  • First highlight: Tin Bitz
  • Second highlight: P3 Blighted Gold (similar to the very old Citadel Colour Shining Gold, but a little darker)
  • Third highlight: Chainmail
  • Wash: 1:1 diluted Devlan Mud
  • Glaze: Heavily thinned Scorched Brown
  • Final highlight: Chainmail blended in to edges, top surfaces and points
  • Final shade: Devlan Mud applied to recesses
It's a bit laborious and it came about because the Blighted Gold wasn't really working for me, but I'm pleased with the end result.


The skulls, horns and axe handles were all painted the same way.
  • Base coat: Charadon Granite
  • First highlight: Khemri Brown
  • Second highlight: Dheneb Stone
  • Final highlight (skulls only): Skull White
I'm not sure about the base, but I think it's alright, I hadn't used lichen before and to be honest it's a bit of a pain, but I think it will get easier with practice.  I think varied colours would also help - particularly with a chaos figure brownish lichen, to suggest the plant life has died, would probably have been more appropriate.  Still it's not a bad effect, and something I'm going to be using more of in the future.

Question - does me listing all the colour I use help?  Do you guys read it all, or does it just get in the way?  Would I be better off posting pictures and shutting up?  I'm no expert but I like to share how I do things if it will help others.  I really would appreciate some feedback on this, so if I'm missing stuff too, let me know.

As always comments and criticism welcome, have at it!